Udawalawe Safari Photography Tips: Complete Guide to Wildlife Photography

Udawalawe safari photography offers exceptional opportunities for capturing stunning wildlife images that rival anything produced in Africa's famous savanna parks. The combination of open grassland terrain providing unobstructed views, reliable year-round elephant encounters guaranteeing photographic subjects, and diverse wildlife creating varied shooting opportunities makes Udawalawe a wildlife photographer's paradise. Whether you're a complete beginner shooting with a smartphone, an enthusiastic amateur with entry-level camera equipment, or an experienced photographer carrying professional gear, understanding how to photograph wildlife at Udawalawe dramatically improves your results and helps you return home with gallery-worthy images documenting your Sri Lankan safari adventure. The park's predictable elephant gatherings around the reservoir, open landscapes allowing creative compositions, and golden-hour lighting during morning and afternoon safaris create ideal conditions for wildlife photography—but maximizing these opportunities requires understanding camera settings appropriate for moving subjects, composition techniques that elevate images beyond simple snapshots, lighting considerations that make or break wildlife shots, and behavioral awareness that helps you anticipate and capture decisive moments. This comprehensive guide explores every aspect of Udawalawe safari photography—from essential equipment recommendations and camera settings for different conditions, to advanced composition strategies, lighting mastery, ethical photography practices, and post-processing techniques that polish your images. We'll help you prepare photographically for your safari, understand how to work effectively from safari vehicles, capture the behavioral moments that create compelling storytelling, and avoid the common mistakes that plague wildlife photography beginners, ensuring you return from Udawalawe with stunning images worthy of the spectacular wildlife you witnessed.
Essential Photography Equipment
Camera Bodies
DSLR and mirrorless cameras represent the ideal equipment for serious Udawalawe wildlife photography, offering interchangeable lenses, manual control over all settings, fast autofocus systems tracking moving subjects, and high-quality image sensors capturing detail even in challenging light. Full-frame sensors provide advantages in low-light performance and image quality, though crop-sensor cameras deliver excellent results while offering "reach multiplication" that effectively extends telephoto lens focal lengths.
Minimum specifications for satisfactory wildlife photography include continuous autofocus capability tracking moving elephants, burst shooting mode capturing 5+ frames per second for action sequences, ISO performance acceptable through at least 1600 (preferably higher for low-light situations), and weather sealing protecting against Udawalawe's dust and occasional rain. Cameras meeting these criteria range from entry-level enthusiast models to professional flagships, all capable of producing excellent wildlife images when used skillfully.

Smartphone photography limitations include fixed focal lengths inadequate for distant subjects, small sensors producing inferior image quality compared to larger cameras, and minimal manual control restricting creative flexibility. However, smartphones excel at documenting wider scenes showing elephants within landscape context, capturing behind-the-scenes safari moments, and providing backup when primary cameras malfunction. Don't dismiss smartphone use entirely—modern flagship phones produce surprisingly good images of closer wildlife and environmental scenes.
Backup equipment considerations: Professional photographers and serious enthusiasts should consider bringing backup camera bodies preventing complete photography failure if primary cameras malfunction. At minimum, ensure you have memory card readers, spare batteries, and possibly a compact backup camera ensuring you can continue shooting if main equipment fails during once-in-a-lifetime safari experiences.
Lenses and Focal Lengths
Telephoto zoom lenses (100-400mm, 150-600mm, or similar ranges) represent the single most important equipment investment for Udawalawe photography. These versatile lenses allow framing elephants and other wildlife at respectful distances, zooming to adjust composition without physically moving closer, and capturing both tighter behavioral portraits and wider environmental scenes. The 100-400mm range suits most situations, while 150-600mm supertelephotos provide extra reach for distant subjects or tighter framing.
Prime telephoto lenses (300mm f/2.8, 400mm f/2.8, 500mm f/4, 600mm f/4) deliver superior optical quality, faster maximum apertures allowing faster shutter speeds and better subject isolation, and often better autofocus performance than zoom lenses. However, their fixed focal lengths, substantial weight, and premium costs make them primarily professional tools. Most amateur photographers achieve excellent results with quality zoom lenses costing and weighing significantly less.
Wide-angle to standard zooms (24-70mm, 24-105mm) complement telephoto lenses by capturing landscape scenes, safari vehicle interiors showing the experience context, and occasionally very close wildlife encounters. While not primary wildlife lenses, these versatile zooms prove useful for environmental portraits showing elephants within their grassland habitat or documenting the broader safari experience.
Focal length requirements: Udawalawe's open terrain and relatively close elephant approaches mean 400mm often provides adequate reach, though longer focal lengths (500-600mm) offer additional flexibility for distant subjects or tighter framing. Crop-sensor cameras effectively multiply focal length (1.5x or 1.6x depending on sensor), turning 400mm into 600mm equivalent reach—a significant advantage for wildlife photography on a budget.

Support Equipment
Beanbags represent the most practical support for safari vehicle photography, conforming to vehicle window frames or roof edges while providing stable platforms dampening vibrations. Fill beanbags with local materials (rice, beans, plastic pellets) after arriving to avoid transporting heavy filled bags, or purchase pre-filled bags from photography shops. Good beanbags dramatically improve image sharpness compared to hand-holding heavy telephoto lenses.
Monopods provide mobile support allowing quick repositioning while reducing the weight burden of heavy lenses during extended shooting. However, monopods work less effectively than beanbags from moving or vibrating vehicles, making them secondary support options for safari photography. They excel during stops when you can plant the monopod base firmly.
Tripods prove largely impractical for safari vehicle photography due to space constraints, setup time requirements, and inability to quickly reposition for moving subjects. Save tripods for stationary landscape photography outside the park rather than attempting to use them during safaris.
Alternative support methods include bracing against door frames or roof openings, using rolled jackets or clothing as improvised lens rests, and employing good hand-holding techniques with proper breathing and body positioning. While inferior to dedicated support, these methods beat unsupported hand-holding particularly with longer, heavier lenses.
Accessories and Essentials
Spare batteries: Carry at least 2-3 fully charged spare batteries since safari vehicles lack charging opportunities and extended shooting drains batteries quickly. Cold mornings, high-speed continuous shooting, and video recording particularly deplete battery life rapidly. Keep spares warm in pockets during cool weather to maintain optimal performance.
Memory cards: Bring substantially more storage capacity than you estimate needing—wildlife photography generates huge image counts as you capture burst sequences hoping to catch perfect behavioral moments. Multiple smaller cards (32-64GB) prove safer than single large cards since card failure loses only one card's images rather than an entire safari's photography.
Lens cleaning supplies: Udawalawe's dry conditions create dusty environments coating lens elements and reducing image quality. Carry rocket blowers removing loose dust without touching glass, microfiber cloths for smudges and fingerprints, and possibly lens cleaning solution for stubborn spots. Clean front elements carefully before important shooting opportunities.
Rain protection: While dry season brings minimal precipitation, wet season safaris encounter afternoon thunderstorms requiring weatherproof camera protection. Rain covers, waterproof bags, or even plastic bags and rubber bands protect expensive equipment from moisture damage. Don't let weather concerns prevent shooting—some of the most atmospheric wildlife images emerge during dramatic weather.
Spare SD card readers: If using laptops for backup or editing during your trip, bring backup card readers since these small devices fail surprisingly often and replacements may be unavailable near Udawalawe.

Camera Settings for Safari Photography
Shooting Modes
Shutter priority (Tv/S mode) provides ideal balance between control and automation for wildlife photography. Set your desired shutter speed based on subject movement and focal length, then let the camera automatically select appropriate aperture and ISO achieving proper exposure. This mode ensures you maintain fast enough shutter speeds preventing blur from subject movement or camera shake while adapting to changing light conditions.
Manual mode (M) offers complete creative control, allowing you to set shutter speed, aperture, and ISO independently. Experienced photographers often prefer manual mode once comfortable reading light and making rapid adjustments, particularly during golden hours when light changes continuously. However, the learning curve makes manual mode challenging for beginners who should master shutter priority first.
Aperture priority (Av/A mode) works well for static subjects or when depth of field control outweighs motion-stopping concerns. Set your desired aperture controlling how much of the scene remains sharp, allowing the camera to select shutter speed. However, this mode risks too-slow shutter speeds with moving elephants unless you carefully monitor shutter speed displays and adjust ISO preventing blur.
Full auto modes should be avoided for serious wildlife photography since they make all decisions for you, often producing suboptimal results. While convenient, auto modes frequently select inappropriate settings—too slow shutter speeds causing motion blur, too wide apertures creating insufficient depth of field, or unnecessary flash activation.
Shutter Speed Selection
General guidelines: As a starting point, use minimum shutter speeds at least 1/500 second for elephants and other large mammals. While elephants move relatively slowly compared to smaller, faster animals, they still shift positions, swing trunks, flap ears, and walk at speeds requiring reasonably fast shutter speeds. The 1/500s baseline provides safety margin against motion blur from both subject movement and safari vehicle vibrations.
Action photography: Increase to 1/1000 second or faster for more dynamic behaviors including bathing elephants splashing vigorously, play-fighting between young bulls, running animals, or birds in flight. The faster the subject movement, the faster the shutter speed required for tack-sharp images freezing action.
Telephoto considerations: Longer focal lengths amplify camera shake requiring faster shutter speeds. The traditional rule suggests minimum shutter speeds equal to 1/(focal length)—so 1/400s for 400mm lenses, 1/600s for 600mm lenses. However, this guideline assumes stationary subjects and good hand-holding technique. For moving subjects from bouncing safari vehicles, increase these minimums substantially to 1/500s or faster regardless of focal length.
Low-light compromises: During early morning, late afternoon, or overcast conditions when light levels drop, you may need to accept slower shutter speeds to achieve proper exposure. In these situations, increase ISO rather than dropping shutter speed below minimums for sharp images, or use wider apertures allowing more light while maintaining adequate shutter speeds.

Aperture and Depth of Field
Portrait apertures (f/4-f/5.6) create beautiful background blur (bokeh) isolating elephants from busy or distracting backgrounds. These wider apertures work excellently for individual elephant portraits or small groups where you want subjects to pop against soft-focused grasslands or vegetation. The shallow depth of field draws viewer attention directly to sharp subjects while minimizing background distractions.
Group photography apertures (f/8-f/11) provide greater depth of field keeping multiple elephants at varying distances acceptably sharp. When photographing herds with individuals scattered across different distances, stopping down to f/8 or narrower ensures more elephants remain in focus creating coherent group images rather than some sharp and others blurred.
Maximum aperture limitations: While your lens's maximum aperture (f/4, f/5.6, or narrower) provides the brightest viewfinder and fastest shutter speeds, don't automatically shoot wide open. Most lenses perform best stopped down 1-2 stops from maximum aperture, delivering sharper images with better contrast. If your lens opens to f/4, consider shooting at f/5.6 for optimal optical quality.
Depth of field preview: Use your camera's depth of field preview button (if available) showing how much of the scene will appear sharp at your selected aperture. This helps verify whether important subject areas will be in focus or fall into blur—particularly useful when photographing elephant herds where you want specific family members sharp.
ISO Management
Base ISO priority: Always use your camera's base ISO (typically 100 or 200) when light allows, producing images with minimal noise, maximum dynamic range, and best color reproduction. Bright midday conditions usually permit base ISO while maintaining fast shutter speeds and reasonable apertures.
ISO elevation strategy: As light levels drop during early morning, late afternoon, or overcast conditions, increase ISO maintaining fast enough shutter speeds for sharp images. Modern cameras handle ISO 800-1600 remarkably well, producing totally acceptable image quality for most uses. Don't fear higher ISOs—slightly noisy but sharp images vastly exceed perfectly clean but blurred images.
ISO limits: Understand your camera's ISO performance limits through testing before your safari. Most enthusiast cameras deliver good results through ISO 3200, acceptable results at ISO 6400, and marginal quality at ISO 12800 or higher. Professional cameras push these limits higher. Knowing your equipment's limits helps you make informed exposure decisions under challenging conditions.
Auto ISO utility: Enabling auto ISO with minimum shutter speed limits prevents accidental too-slow shutter speeds causing motion blur. Configure auto ISO to maintain your desired minimum shutter speed (e.g., 1/500s), allowing ISO to increase automatically as light drops. This semi-automatic approach combines manual aperture control with intelligent shutter speed and ISO management.

Autofocus Configuration
Continuous autofocus (AI Servo/AF-C): Always use continuous autofocus modes for moving subjects, tracking elephants as they walk, feed, or interact. This mode constantly adjusts focus following subject movement, keeping moving animals sharp. Single-shot autofocus (appropriate for static subjects) locks focus once then stops adjusting—a recipe for out-of-focus images when subjects move.
Focus point selection: Choose focus point strategies balancing precision against coverage. Single-point focus provides maximum control, placing focus exactly where you want (typically the nearest eye for animal portraits). Zone or group focus covers wider areas tracking erratically moving subjects more reliably. For elephants' relatively predictable movement, single-point often works well, while smaller faster animals benefit from zone coverage.
Back-button focus: Separating focus activation from the shutter button (assigning focus to a rear button) provides more control and prevents inadvertent refocusing during critical moments. With back-button focus, hold the rear button to engage continuous focus tracking, then release when focus is perfect and shoot without the shutter button reactivating focus. This technique requires practice but greatly improves control once mastered.
Focus priority vs. release priority: Configure whether your camera prioritizes achieving perfect focus before allowing shooting (focus priority) or permits shooting immediately even if focus isn't confirmed (release priority). For wildlife, release priority often works better since it ensures you don't miss critical moments waiting for autofocus confirmation, though it risks some out-of-focus shots.
Drive Modes and Burst Shooting
High-speed continuous shooting: Always enable your camera's fastest continuous shooting mode (typically 5-10+ frames per second depending on camera) for wildlife photography. Elephants' behaviors—ear flaps, trunk movements, social interactions—happen quickly and unpredictably. Burst shooting increases odds of capturing peak behavioral moments with optimal expressions and positioning.
When to burst shoot: Use continuous shooting for any action or interaction—elephants bathing, play-fighting, mothers with calves, feeding sequences, and social encounters. Hold the shutter button down through interesting behaviors, capturing multiple frames increasing chances of perfect timing. For static elephants simply standing, individual frames suffice.
Buffer management: Understand your camera's buffer capacity (how many consecutive shots before the camera must pause to write images to memory card). High-end cameras offer deeper buffers supporting longer bursts, while entry-level cameras require more frequent pauses. Faster memory cards reduce buffer clearing time, allowing quicker return to shooting.
Selective shooting: While burst mode increases keeper rates, avoid machine-gunning every elephant sighting. Be selective, shooting bursts during interesting behaviors while conserving storage and battery during static moments. This discipline prevents overwhelming yourself with thousands of redundant images requiring extensive culling during editing.

Composition Techniques
Rule of Thirds and Subject Placement
Grid overlay utilization: Mentally divide your frame into thirds both horizontally and vertically, creating nine equal sections with four intersection points. Placing primary subjects (elephants' heads or bodies) at these intersection points creates more dynamic, visually interesting compositions than centering subjects. Most cameras offer optional grid displays in viewfinders assisting with this compositional technique.
Horizon placement: Position horizons along upper or lower third lines rather than bisecting images through the middle. Lower-third horizons emphasize dramatic skies—beautiful during monsoon season with impressive clouds or sunset/sunrise conditions. Upper-third horizons emphasize foreground and subjects—often more appropriate for wildlife photography focusing on elephants in their grassland habitat.
Eye-level placement: For animal portraits, position the eye (or eyes if photographing head-on) at upper-third intersections drawing viewer attention directly to this critical focal point. Eyes naturally attract human attention, so placing them at powerful compositional points creates engaging images.
Breaking rules intentionally: While the rule of thirds provides reliable compositional framework, don't follow it slavishly. Centered compositions work beautifully for symmetrical subjects or when emphasizing subject isolation. Trust your artistic instincts, using guidelines as starting points rather than absolute laws.
Perspective and Shooting Angles
Eye-level shooting: Whenever possible, position your camera at elephant eye level rather than shooting downward from tall safari vehicles. This creates more intimate, engaging perspectives showing elephants as subjects of equal status rather than diminished creatures below you. Eye-level shooting requires lowering your camera position as much as vehicle configuration allows or photographing elephants on elevated ground.
Low-angle advantages: Shooting from below looking slightly upward emphasizes subjects' size and power, creates dramatic impact, and often provides cleaner backgrounds by eliminating distracting ground clutter. When elephants stand on reservoir banks or hillsides above your vehicle, capitalize on these low-angle opportunities producing heroic portraits.
High-angle applications: While generally less flattering, overhead angles work effectively for showing patterns within large groups, illustrating family structures as herds arrange themselves spatially, or revealing interesting ground textures and shadows. Aerial perspectives from roof-hatch shooting positions occasionally provide unique compositional options.
Background awareness: Shooting angle dramatically affects backgrounds—lowering perspective often provides cleaner backgrounds of sky or distant landscape, while higher angles introduce more ground, vegetation, and potential clutter. Consciously consider how angle selection affects both subject presentation and background quality.

Framing and Negative Space
Tight framing: Filling the frame with your subject creates powerful impact, emphasizing details like wrinkled elephant skin, expressive eyes, or impressive tusks. Tight framing works excellently for portraits and behavioral close-ups where you want viewers to connect intimately with individual elephants.
Environmental context: Pulling back to include surrounding habitat tells richer stories showing elephants within their ecosystem. These wider compositions provide context about habitat, illustrate the open grassland environment, and create images with stronger sense of place than tight portraits detached from settings.
Negative space utilization: Intentionally including empty space around subjects creates elegant, minimalist compositions drawing attention to carefully-placed subjects. Space also provides room for implied movement—if photographing walking elephants, leave space in the direction they're moving rather than having them walk toward frame edges.
Foreground and background layers: Including foreground elements (grass, branches, other elephants) creates depth and three-dimensionality in otherwise flat images. Slightly out-of-focus foreground elements frame subjects while background elements provide context and layers. These compositional techniques transform simple snapshots into sophisticated images with visual depth.
Subject Arrangement in Groups
Odd numbers: When composing group shots, odd numbers of subjects (three or five elephants) generally create more pleasing compositions than even numbers. This photographic principle, while not absolute, often produces more dynamic arrangements than pairs or fours.
Triangular arrangements: Elephants naturally arranged in triangular patterns create stable, visually pleasing compositions guiding viewer eyes through the frame. Watch for family groups positioning themselves triangularly—mother in front with calves behind in V-formation, or three adults forming natural triangles.
Leading lines: Use elephant trunks, tusks, or entire bodies as leading lines directing viewer attention through compositions. A line of elephants walking creates natural linear elements guiding eyes across frames, while intertwining trunks during greetings form connecting lines between individuals.
Separating subjects: When photographing multiple elephants, ensure adequate visual separation preventing subjects from merging into confusing masses. Adjust your shooting position slightly, wait for elephants to separate naturally, or selectively focus on subgroups within larger herds producing clearer, more readable compositions.

Capturing Behavior and Storytelling
Anticipatory shooting: Learn to recognize behavioral precursors indicating interesting actions about to occur—elephants approaching water will bathe, youngsters play-fighting will escalate action, calves near mothers will seek nursing. Anticipating behaviors allows you to prepare camera settings and composition before action peaks, capturing decisive moments rather than shooting after the fact.
Interaction documentation: Photographs showing elephants interacting—mothers touching calves tenderly, siblings playing, bulls sparring, entire herds greeting after separation—tell richer stories than isolated portraits. Interaction images reveal elephant society's complexity and emotional depth, creating powerful narrative photographs.
Sequential storytelling: Rather than seeking the single perfect image, shoot sequences documenting complete behavioral stories from beginning through climax to resolution. Series of images showing an elephant approaching water, entering, bathing, and emerging tell complete stories more engaging than single isolated frames.
Decisive moments: Some behaviors peak at specific instants—the apex of trunk spray during bathing, the moment tusks clash during sparring, the expression exchanged between mother and calf. Developing timing sense to capture these decisive moments requires practice and familiarity with elephant behavior but produces images capturing the essence of moments.
Lighting Considerations
Golden Hour Magic
Morning golden hour (approximately 30-60 minutes after sunrise) provides warm, directional light creating rich colors, long dramatic shadows, and magical atmospheric quality. At Udawalawe, morning safaris starting at 6:00 AM capitalize on this premier lighting, particularly during dry season when sunrise occurs around 6:00 AM. The warm light beautifully illuminates elephants' grey skin, enhances golden-brown grasslands, and creates three-dimensional modeling impossible during harsh midday light.
Evening golden hour (approximately 30-60 minutes before sunset) delivers similarly beautiful lighting from the opposite direction. Afternoon safaris ending around 6:00 PM during dry season provide opportunities to photograph elephants in this stunning evening glow. The warm light transforms ordinary scenes into spectacular images, making golden hour timing worth planning safaris specifically to capitalize on optimal lighting.
Blue hour extension: The period immediately after sunset or before sunrise when the sky glows blue provides brief opportunities for silhouettes and atmospheric scenes. While challenging for traditional wildlife photography due to low light levels, blue hour creates moody, artistic images particularly when elephants appear against colorful twilight skies.
Seasonal variations: Sunrise and sunset times shift throughout the year affecting when golden hour occurs relative to safari schedules. During wet season (October-April), sunrise happens later and sunset earlier, potentially aligning differently with safari times. Research sunrise/sunset times for your specific visit dates ensuring safari timing captures golden hour light.

Midday Light Management
Harsh light challenges: Midday sun creates extreme contrast with deep shadows and blown highlights, unflattering lighting direction from directly overhead, squinting and closed eyes from elephants, and washed-out colors lacking the richness of angled light. These conditions make midday photography technically and aesthetically challenging.
Working with midday sun: When stuck shooting during harsh midday light, look for elephants in partial shade softening contrast, slightly underexpose to preserve highlight detail in bright skin areas, convert particularly contrasty images to black and white where contrast becomes an asset, and focus on elephant behaviors and interactions carrying images regardless of lighting limitations.
Elephants as subjects: Fortunately, elephants' grey skin handles harsh light better than many subjects, showing less dramatic highlights and shadows than lighter or darker animals. While not ideal, midday elephant photography produces more acceptable results than many wildlife situations.
Alternative approaches: Use harsh midday conditions for photographing other subjects—detailed texture studies showing elephant skin patterns, graphic high-contrast compositions emphasizing shapes over subtle tones, or silhouettes against bright sky. Creative approaches turn lighting limitations into artistic opportunities.
Directional Lighting
Front lighting: Light coming from behind your position illuminating subjects' fronts creates even, well-exposed images ideal for showing colors and details clearly. However, front lighting produces flat, dimensionless results lacking the modeling that creates visual interest. Use front lighting when detail visibility outweighs artistic concerns.
Side lighting: Light striking subjects from perpendicular to your shooting direction creates dramatic three-dimensionality, emphasizing textures through shadows and highlights, revealing elephants' skin wrinkles and contours, and producing visually engaging images with depth and modeling. Side lighting particularly enhances male elephants' powerful musculature and head structure.
Back lighting: Light behind subjects creates challenges with exposure but opportunities for creative images. Rim lighting outlines elephants' bodies and particularly their ears with glowing highlights, dust illuminated by backlighting creates atmospheric effects showing elephant activity, and silhouettes against bright backgrounds produce dramatic graphic images. Back lighting requires exposure compensation (typically +1 to +2 stops) preventing subjects from rendering as pure silhouettes unless that's the creative intent.
Top lighting: Overhead light during midday creates the least flattering lighting direction, though it remains acceptable particularly for elephant photography. Minimize top lighting problems by seeking subjects in partial shade, shooting when elephants lift heads looking up exposing faces to light, or simply accepting that behavior and composition can carry images despite lighting limitations.

Overcast and Wet Season Lighting
Soft light advantages: Overcast conditions provide beautifully soft, even illumination without harsh shadows or blown highlights, allowing shooting throughout the day without concerns about harsh light timing, and producing images with subtle tonal gradations and rich color saturation. These conditions particularly suit photographing elephants in green wet-season landscapes where the diffused light enhances rich vegetation colors.
Exposure adjustments: Overcast skies often fool camera meters into overexposing, producing grey washed-out images. Add -0.3 to -1 stop exposure compensation maintaining proper exposure with rich tones rather than muddy greys. Review histograms ensuring proper exposure rather than trusting camera screens which appear differently depending on ambient brightness.
White balance considerations: Overcast light has cooler (bluer) color temperature than sunny conditions. While auto white balance usually handles this adequately, manually setting cloudy white balance ensures warmer more neutral tones. Alternatively, shoot RAW files allowing complete white balance adjustment during post-processing without quality loss.
Creative opportunities: Dramatic monsoon clouds, mist and fog during early wet season mornings, and rain creating atmospheric conditions all provide unique photographic opportunities unavailable during dry season. Embrace weather-related lighting rather than viewing overcast conditions as inferior to sunny skies.
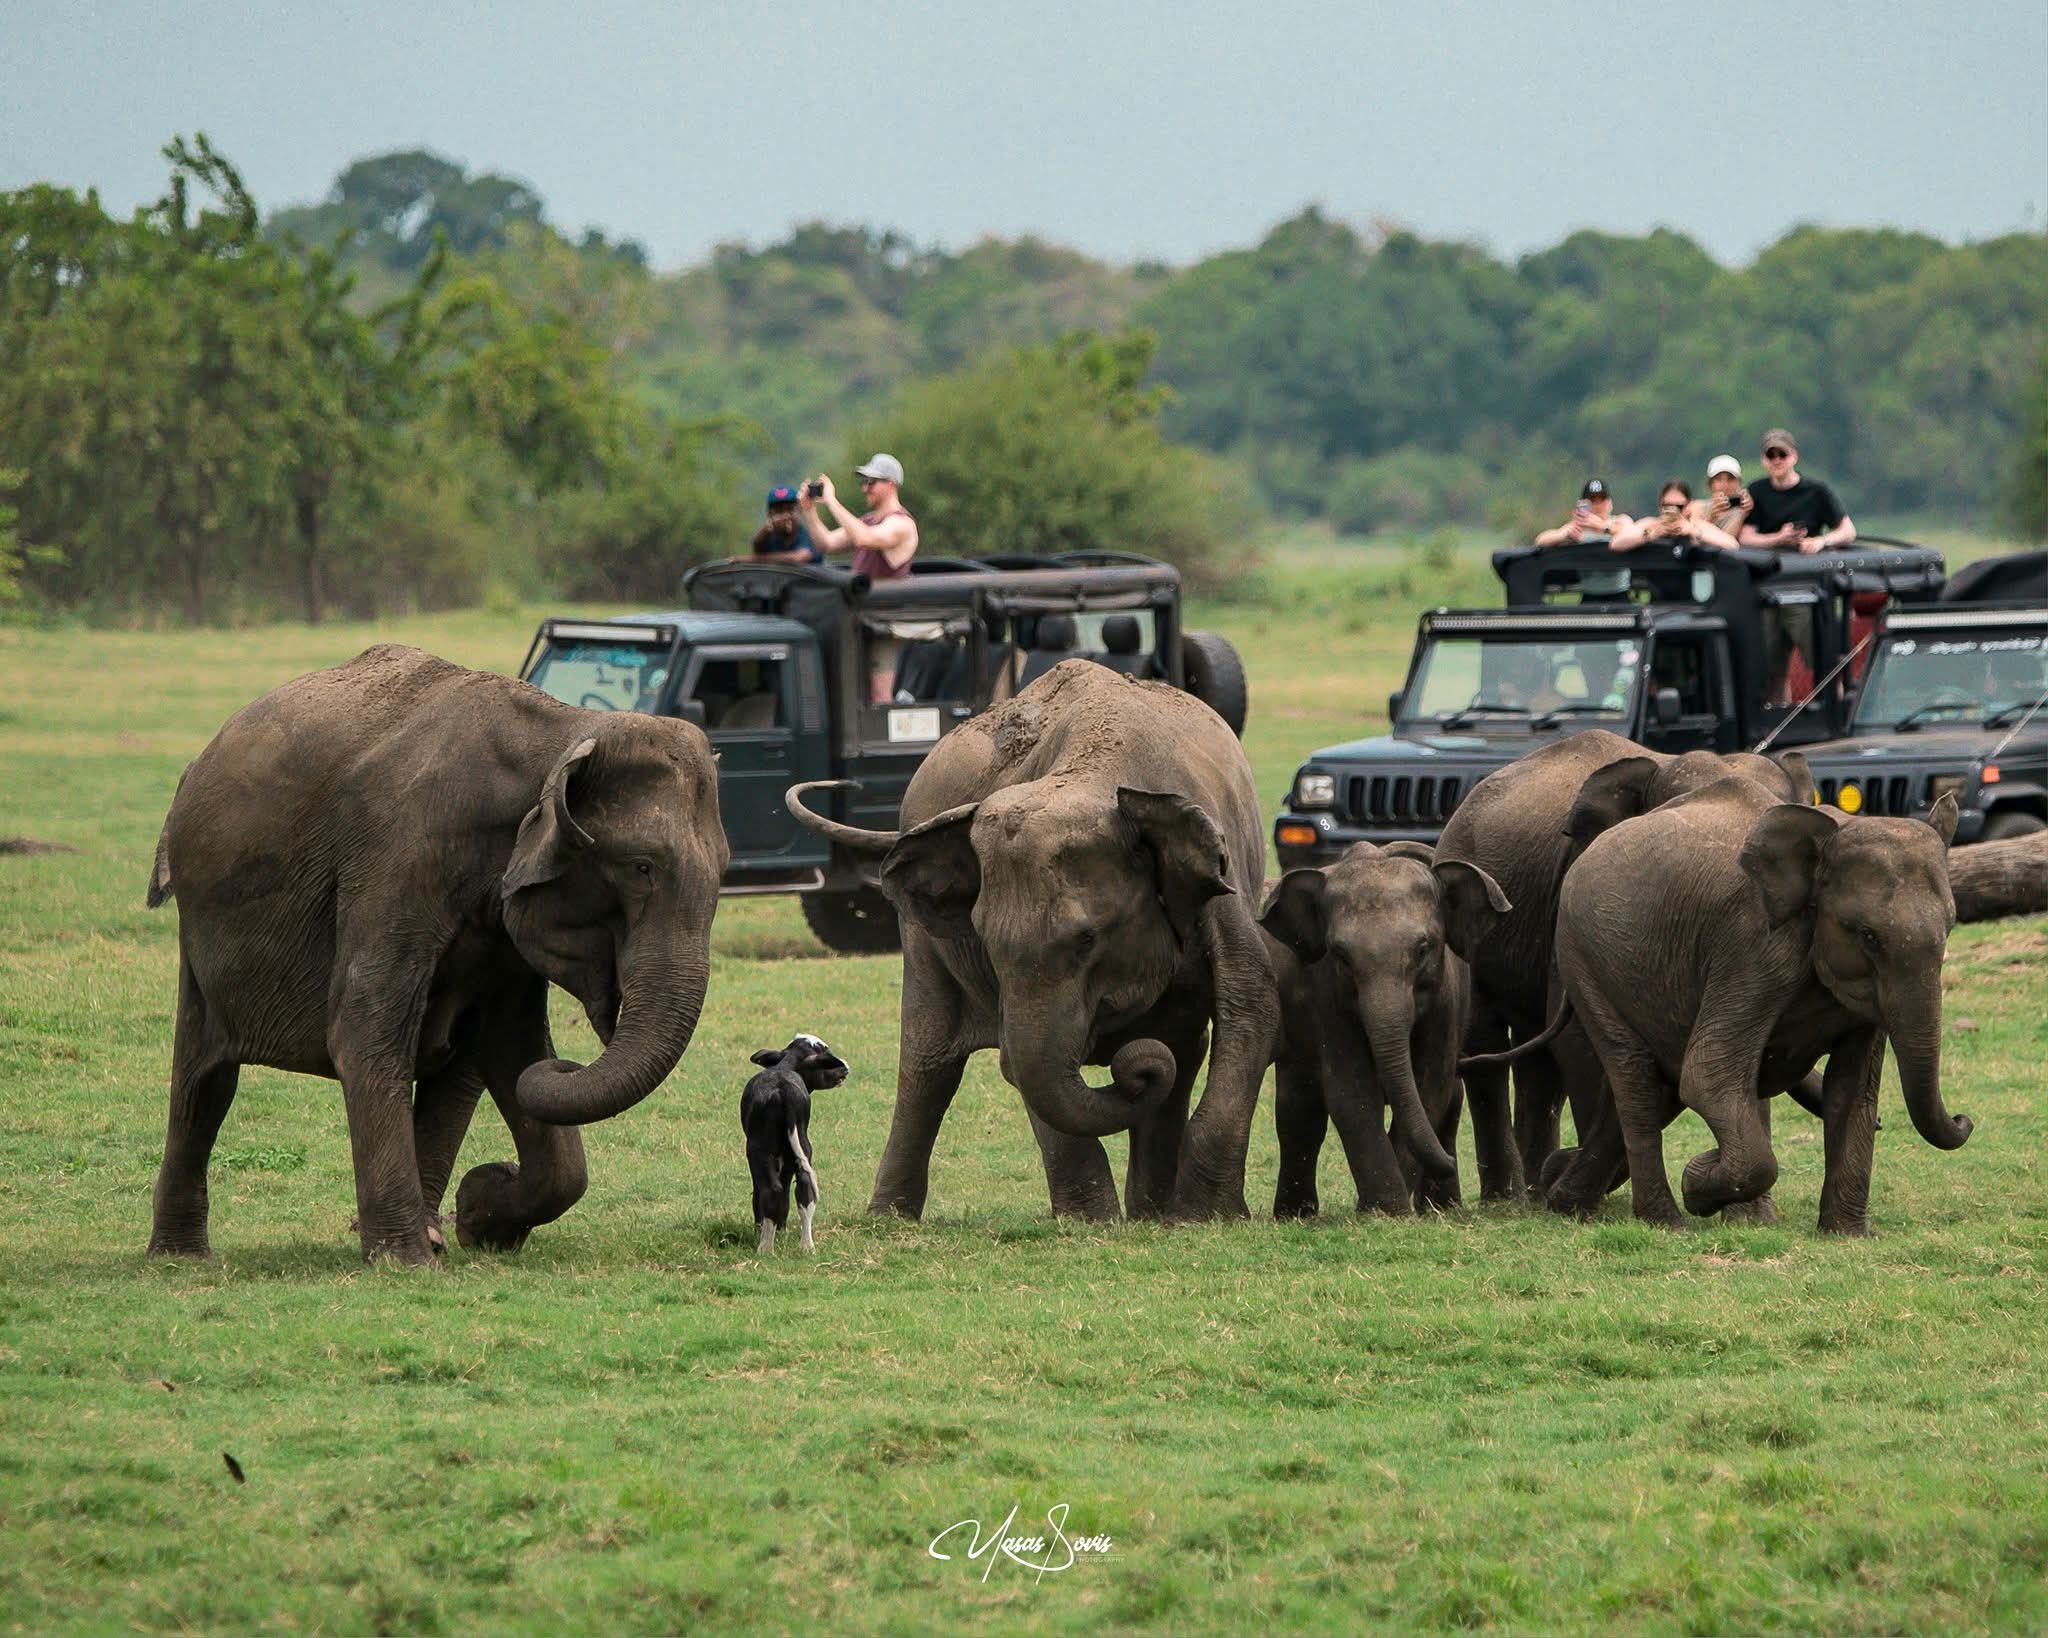
Working from Safari Vehicles
Vehicle Photography Challenges
Vibration management: Safari vehicles vibrate continuously from engines, rough roads, and driver movements. These vibrations transmit through your body to the camera causing micro-blur ruining sharpness despite adequate shutter speeds. Combat vibration through beanbag support isolating camera from vehicle, faster shutter speeds providing safety margin, and shooting during brief stops when engine vibration ceases.
Limited positioning: Unlike ground-level photography where you can freely move seeking optimal angles, safari vehicles confine you to specific positions and heights. Work within these constraints by asking drivers to position vehicles optimally (when safely possible), shooting from different seats during stops as necessary, and accepting that vehicle-based photography inherently limits compositional options compared to ground-level work.
Other passengers: Shared safari vehicles require respecting other passengers' viewing and photography needs. Don't monopolize prime positions or demand vehicles remain at sightings indefinitely while you photograph. Balance your photography passion against others' experiences, sharing opportunities equitably. Private jeep bookings eliminate this consideration allowing unlimited photography time without guilt.
Heat and dust: Udawalawe's hot, dusty conditions challenge both photographers and equipment. Protect yourself with sun protection and hydration while shielding equipment from dust accumulation degrading image quality and potentially damaging sensors. Regular lens cleaning and weatherproofing become essential maintenance tasks.

Positioning and Stability
Beanbag technique: Rest your lens on beanbags positioned on window frames or roof edges, allowing the conforming bag to support lens weight while dampening vibration. Keep your hands on the camera and lens controlling aim and triggering shutter without adding pressure pushing camera down into the beanbag. Gentle contact maintains control without introducing hand shake.
Body bracing: When beanbags aren't available or practical, brace yourself against vehicle structure creating stable shooting platforms. Press against door frames, brace elbows on seats or window ledges, and adopt stable sitting or standing positions minimizing body sway. Good bracing technique significantly improves hand-held stability.
Shooting during stops: Whenever possible, shoot during brief vehicle stops when engine vibration ceases and you can stabilize completely. Communication with drivers about optimal stopping points for photography improves results dramatically. However, animals often move away during stops, so sometimes shooting from moving vehicles becomes necessary despite increased difficulty.
Roof hatch shooting: Many safari jeeps feature pop-up roof hatches allowing standing and shooting downward at better angles. These positions provide excellent visibility and cleaner backgrounds but require careful balance and strong core stability particularly when vehicles move. Always hold roof edges or internal supports preventing falls during sudden movements.
Communication with Drivers
Pre-safari briefing: Discuss your photography intentions with drivers before safaris begin, explaining that you need positioning for optimal light direction, would appreciate brief stops at good sightings for shooting, and understand safety limitations preventing perfect positioning in all situations. Drivers familiar with photographer needs often provide superior service when they understand your priorities.
Positioning requests: Politely request specific vehicle positioning when safely possible—asking drivers to circle for better light angles, adjust distance for optimal framing, or stop briefly for shooting. However, always defer to drivers regarding safety and park regulations. Never pressure drivers to position closer to wildlife than regulations permit or they're comfortable with.
Light direction awareness: Experienced wildlife photography drivers understand shooting toward light creates backlit silhouettes while shooting with light behind you illuminates subjects well. Communicate light preferences helping drivers position optimally without extensive explanation of photographic principles.
Tipping for photography support: Drivers and guides providing exceptional photography support through careful positioning, extended time at sightings, and understanding of photographers' needs deserve appropriate gratuity recognition. Good tips incentivize quality service and recognize efforts beyond basic driving duties.

Advanced Techniques
Panning for Motion
Panning technique: Follow moving subjects with your camera tracking their movement while triggering shutter at relatively slow speeds (1/60-1/250 second). This technique renders moving subjects relatively sharp while blurring stationary backgrounds into streaks indicating motion and dynamism. Panning requires practice but creates dramatic images showing elephants in motion rather than frozen mid-stride.
Settings for panning: Use shutter priority mode selecting speeds slow enough to blur backgrounds but fast enough to maintain some subject sharpness (typically 1/125 second as starting point for walking elephants), continuous autofocus tracking moving subjects, and burst mode increasing odds of tack-sharp frames within sequences. Practice panning technique before critical moments developing smooth tracking motion.
When to pan: Walking or running elephants provide ideal panning subjects, particularly when crossing in front of distant backgrounds providing canvas for motion blur. Elephants moving along reservoir edges with vegetation or water backgrounds work beautifully for panning techniques.
Creative Blur and Motion
Intentional blur effects: Slow shutter speeds (1/30 second or slower) combined with moving subjects create impressionistic blur suggesting motion and energy. While not technically perfect, these abstract images convey dynamism traditional sharp photos cannot capture. Experiment with very slow shutter speeds during less critical moments developing this creative technique.
Zooming during exposure: Zooming lens during exposure with slower shutter speeds (1/30 second) creates radial blur effects expanding from image centers. This technique adds energy and dynamism to images though it rarely produces consistently successful results. However, experimental creativity sometimes yields surprising artistic successes worth attempting.
Multiple exposure techniques: Some cameras offer in-camera multiple exposure features combining two or more frames into single images. Creative multiple exposures can layer elephants with their habitat, combine sharp and blurred versions showing motion, or create artistic interpretations beyond straight documentation.
Silhouettes and Backlighting
Silhouette creation: Position elephants between your camera and bright backgrounds (sunset skies, bright clouds, reflective water surfaces), expose for the background brightness (often -1 to -2 stops exposure compensation), and let subjects render as dark silhouettes. Clean recognizable elephant shapes with distinct tusks, trunks, or ear outlines create the strongest silhouettes.
Partial backlighting: Rather than complete silhouettes, partial backlighting renders subjects dark but not completely black, showing subtle detail in shadow areas while bright backgrounds and rim lighting create drama. This approach requires careful exposure balancing highlights and shadows, often necessitating slight overexposure relative to metered readings.
Rim lighting: Backlighting creates glowing highlights outlining subjects—particularly beautiful when illuminating elephants' ear edges. Position subjects so light strikes from behind and slightly above creating these rim-light effects. The translucent ears become luminous when backlit, creating magical effects impossible with other lighting directions.

Black and White Conversion
When to consider B&W: Images with strong compositional elements but challenging color (harsh midday light, mixed color temperature, distracting color patches), high-contrast scenes emphasizing shapes over colors, and artistic interpretations emphasizing emotion and drama often benefit from black and white conversion. Not every image suits monochrome, but when appropriate, B&W eliminates color distractions focusing attention on form, texture, and emotion.
Conversion techniques: While you can convert to B&W in-camera, shooting color RAW files allows non-destructive conversion during post-processing with complete control over tonal relationships. Specialized B&W conversion tools (in Lightroom, Photoshop, or dedicated plugins) provide far more control than simple desaturation, allowing you to adjust how different colors convert to grey tones.
B&W optimization: Black and white conversion works best for images with strong contrast, compelling textures (elephant wrinkled skin translates beautifully to B&W), clear subjects against simple backgrounds, and graphic compositions emphasizing shape over color. Consider B&W as interpretation tool enhancing certain images rather than correction for color problems.
Photographing Specific Subjects
Elephant Portraits
Eye focus critical: Always focus on the nearest eye when photographing animal portraits. Sharp eyes create connection with viewers while all other elements can be slightly soft without ruining images. Use single-point autofocus ensuring precise eye placement, or verify eye sharpness when using zone focus modes that might lock on elephants' bodies instead of eyes.
Fill-the-frame impact: Elephant portraits work beautifully when subjects fill frames, showing detailed skin textures, expressive eyes, and individual character. Don't hesitate to crop tightly emphasizing head and facial features rather than including entire elephants unnecessarily.
Profile vs. frontal views: Side profile shots showing elephant head shapes, impressive tusks, and distinctive ear contours work wonderfully. However, frontal views looking directly into eyes create even stronger emotional connections when composed well. Experiment with various angles learning what works best for individual elephants based on features like tusk configuration or ear shape.
Character revelation: Watch for individual personality and character revealed through expressions, postures, or behaviors. Patient young mothers tending calves, playful adolescents, wise elderly matriarchs, and powerful bulls all display distinctive character worth capturing through careful observation and timing.

Mother and Calf Interactions
Tender moments: The relationship between elephant mothers and calves provides endless photographic opportunities showing universal themes of maternal care, protection, teaching, and affection. Watch for mothers guiding calves with trunks, youngsters staying close to mothers' legs, and the constant physical contact maintaining bonds.
Nursing behavior: Calves nursing underneath mothers create touching images showing intimate family bonds, though photographing nursing requires patience waiting for proper positioning and lighting. These behaviors happen regularly so persistence pays off.
Play and learning: Young calves explore their world under mothers' watchful supervision, practicing trunk control, learning to feed, and attempting to keep up with herd movements. These developmental behaviors create charming, endearing images appealing to all viewers.
Protective behaviors: Mothers' protective reactions when they perceive threats to calves demonstrate the intensity of elephant maternal bonds. Watch for mothers positioning between perceived dangers and calves, wrapping trunks protectively around youngsters, and the heightened alertness mothers display when calves are present.
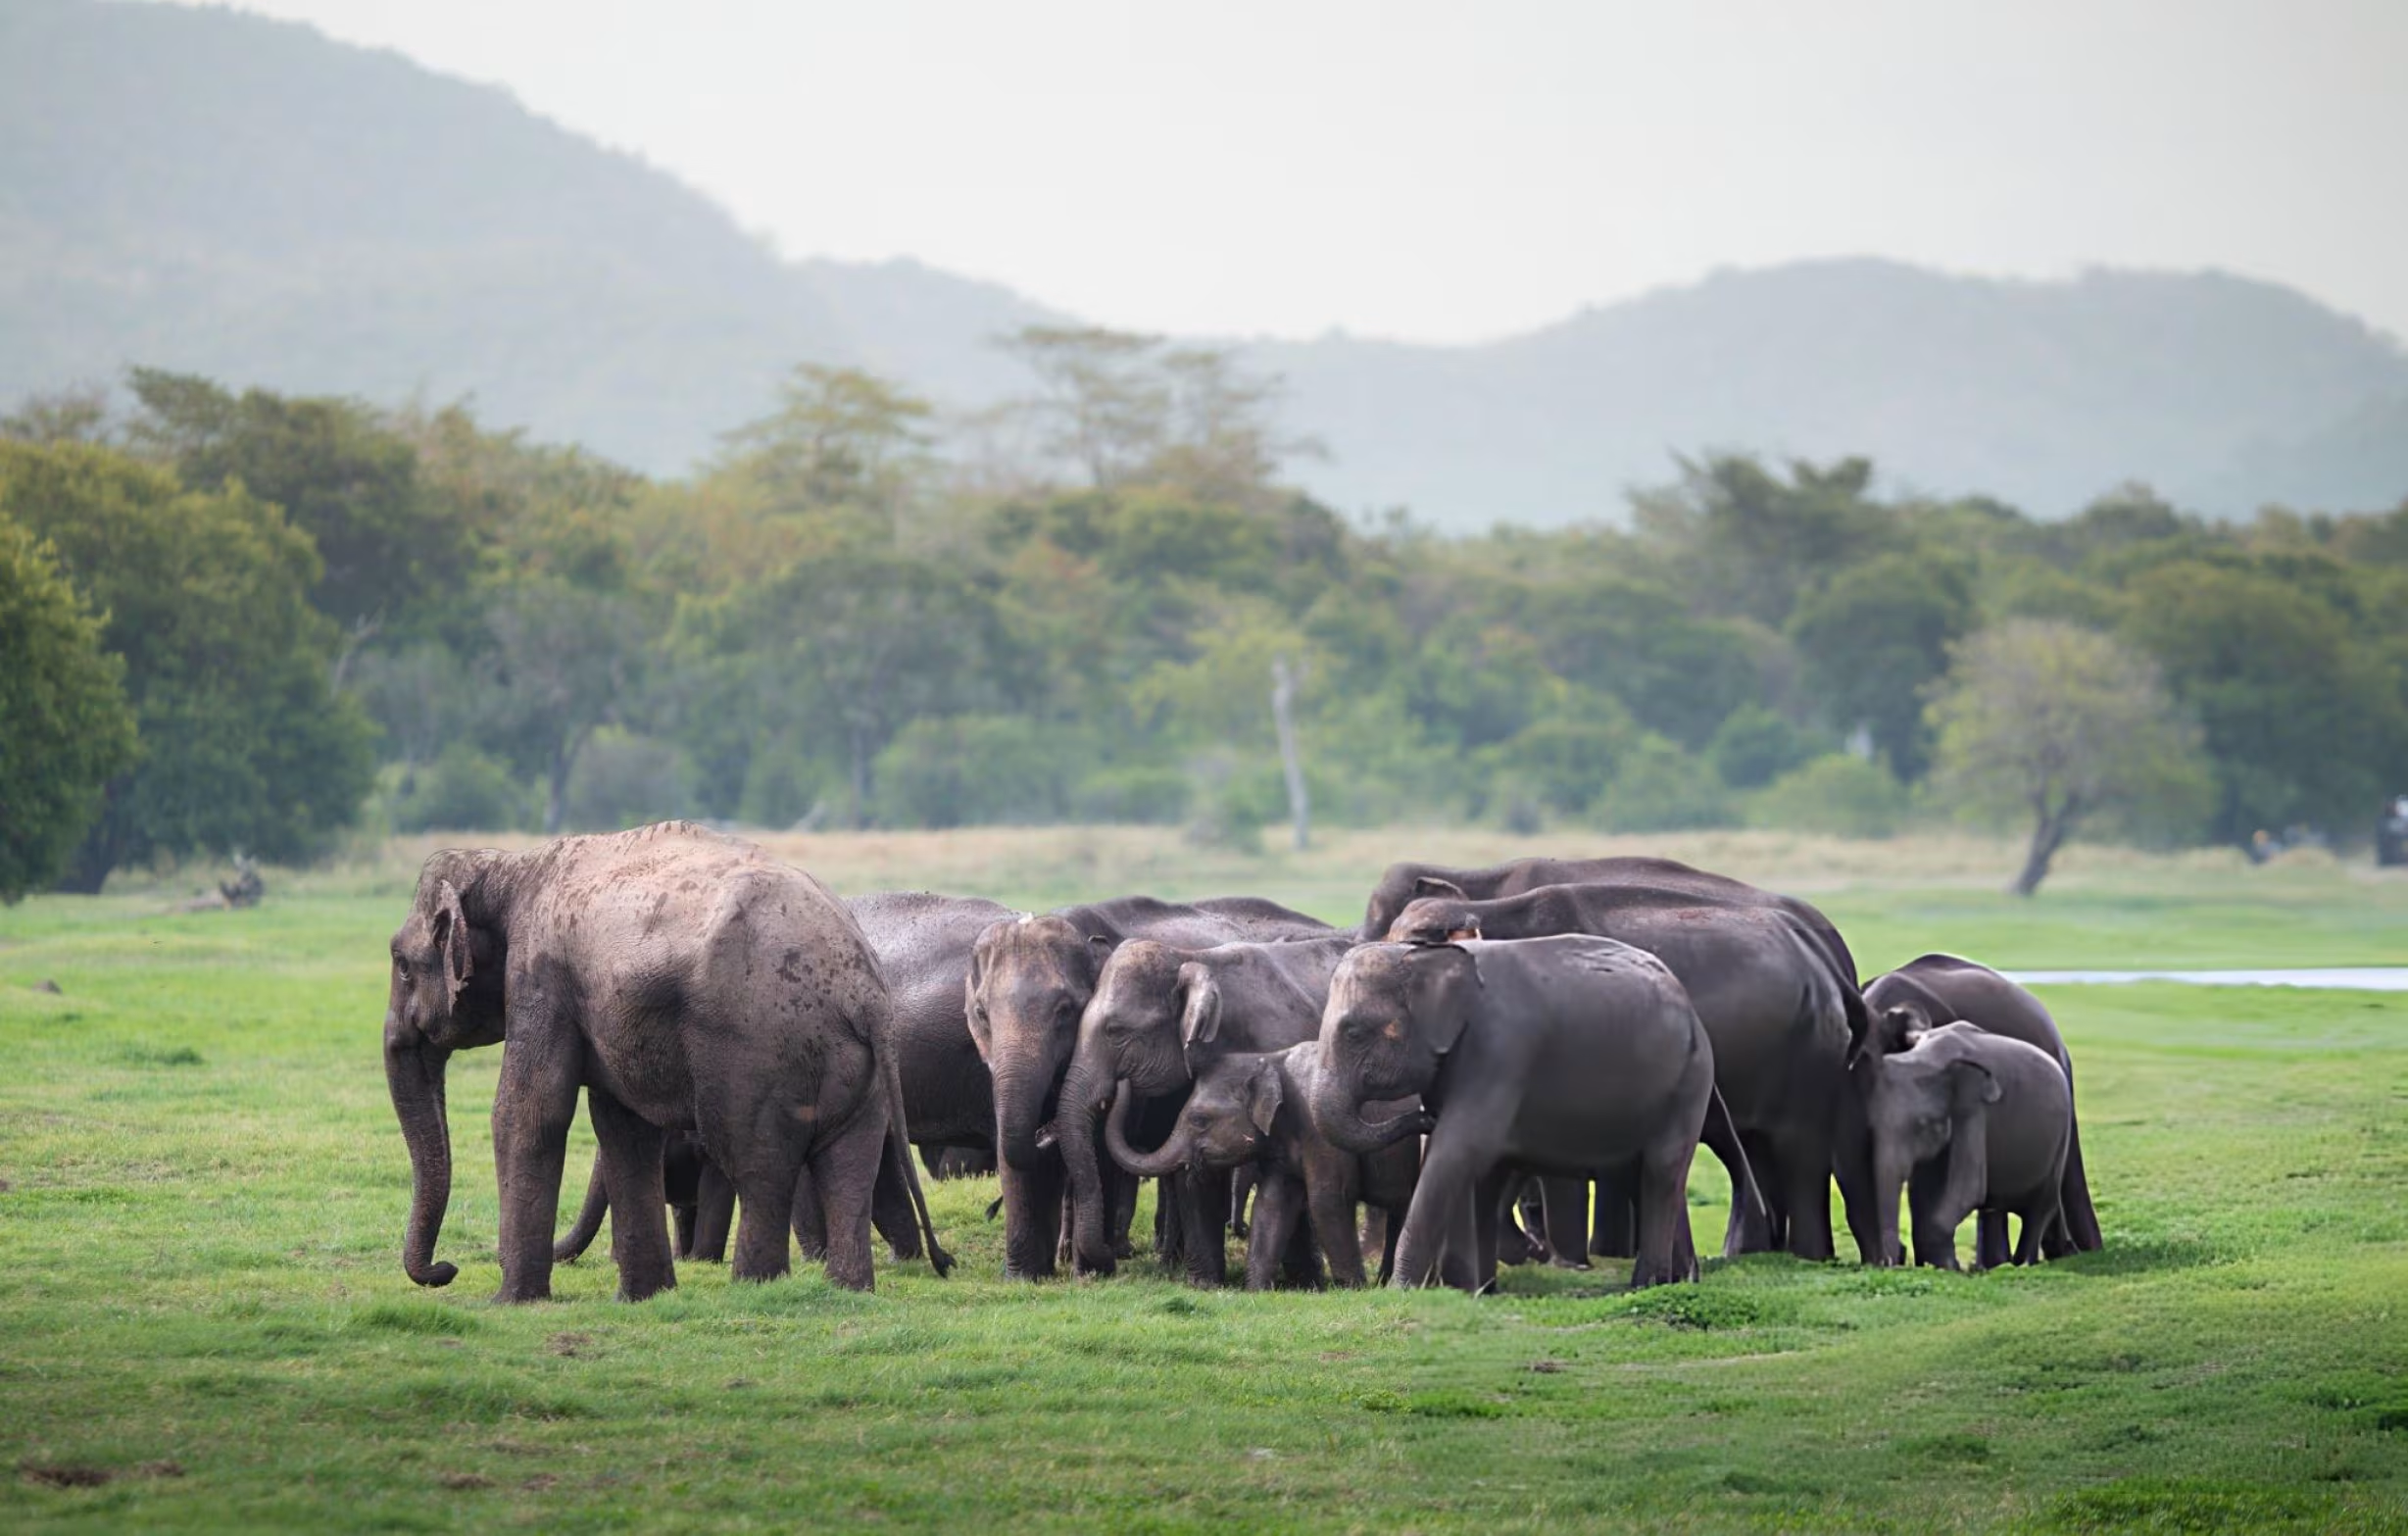
Herd Dynamics and Social Behavior
Family coordination: Elephant herds move and behave with remarkable coordination revealing tight social bonds. Photograph herds moving together in organized processions, gathering at water as cohesive groups, and the spatial arrangements showing family relationships and hierarchies.
Greeting ceremonies: When separated elephants reunite, they engage in elaborate greeting behaviors including trunk intertwining, vocalizations, temporal gland secretions, and obvious excitement. These interactions provide wonderful opportunities showing elephant emotional capacity and social complexity.
Play behavior: Young elephants' play-fighting, chasing, and general exuberance create dynamic, energetic images full of life and joy. Adolescent males particularly engage in frequent sparring practices developing fighting skills they'll need as adults competing for breeding access.
Conflict and dominance: While serious elephant fights are rare (and potentially dangerous to photograph), dominance displays and minor conflicts reveal herd social structure and individual relationships. Watch for larger elephants asserting priority at water sources, bulls jockeying for position, and the subtle body language communicating social status.

Bathing and Wallowing
Water photography: Elephants bathing provide some of safari photography's most dynamic, engaging images. Photograph elephants wading into water, spraying themselves with trunks, submerging partially, rolling joyfully, and the playful splashing that makes bathing so photogenic. Fast shutter speeds freeze water droplets mid-air while slower speeds (1/250-1/500 second) show movement through slight motion blur in water.
Mud wallowing: Elephants coating themselves in mud for sun protection and parasite control engage in vigorous rubbing, rolling, and throwing creating messy, primal scenes showing their wild nature. These behaviors photograph wonderfully despite muddy results sometimes making elephants' beauty less obvious than when clean.
Timing considerations: Bathing typically occurs mid-morning and late afternoon when elephants visit the reservoir after feeding sessions. Plan shooting around these predictable bathing times maximizing chances of capturing dynamic water behavior.
Multiple subjects: Bathing scenes often involve entire herds creating opportunities for showing group dynamics and family bonds as elephants bathe together, youngsters learn bathing techniques from elders, and everyone enjoys cooling relief from heat.
Other Wildlife at Udawalawe
Water buffalo: Large buffalo herds create impressive scenes particularly when gathered densely wallowing in mud or drinking at reservoir edges. Their imposing size, curved horns, and often dramatic postures when alert make them compelling photographic subjects beyond elephants.
Deer species: Spotted deer's beautiful markings and graceful forms photograph wonderfully, while impressive sambar deer stags with large antlers command attention. Both species often appear in good light feeding during golden hours creating beautiful images.
Birds: Udawalawe's diverse birdlife includes spectacular large species like painted storks, pelicans, and eagles photographing well even with modest telephoto lenses. Bird photography requires faster shutter speeds (1/1000+ second) and careful timing but adds variety to exclusively elephant-focused collections.
Reptiles: Crocodiles basking on mudbanks, water monitors hunting along shores, and occasionally visible snakes provide reptile photography opportunities showing ecosystem diversity beyond charismatic mammals.

Post-Processing and Editing
RAW vs. JPEG Workflow
RAW advantages: Always shoot RAW format rather than JPEG when possible, providing maximum editing flexibility for exposure adjustment, white balance correction, highlight recovery, shadow detail lifting, and non-destructive processing. RAW files contain far more data than JPEGs allowing significant editing latitude recovering images that initially appear over or underexposed.
JPEG limitations: JPEGs apply in-camera processing permanently baking decisions into files and discarding data. While JPEGs require less storage and processing time, their limited editing flexibility makes them poor choices for serious photography. The storage savings rarely justify the flexibility sacrifice, particularly given modern large, inexpensive memory cards.
Dual-format shooting: If concerned about workflow or storage, shoot RAW+JPEG simultaneously. Share JPEGs immediately while retaining RAW files for serious editing, or use JPEGs for quick review identifying keepers warranting RAW processing investment. However, be aware dual-format shooting fills cards twice as quickly and slows burst shooting rates on some cameras.
Basic Adjustments
Exposure optimization: Adjust overall exposure brightening or darkening images achieving optimal tonal distribution. Use histogram displays ensuring you're not clipping highlights or crushing shadows unnecessarily, though some clipping in unimportant areas often proves acceptable.
White balance correction: Correct color casts from incorrect white balance settings rendering scenes too warm (orange) or too cool (blue). Elephant images often benefit from neutral to slightly warm white balance avoiding cold, uninviting tones.
Contrast and clarity: Increase contrast slightly adding punch to flat images while adjusting clarity (midtone contrast) enhancing detail and perceived sharpness. However, avoid excessive adjustments creating harsh, unnatural appearances or obvious halos around subjects.
Saturation and vibrance: Enhance color intensity moderately through saturation (affects all colors equally) or vibrance (affects muted colors more than already-saturated ones) adjustments. Udawalawe's dry season golden tones respond beautifully to subtle saturation increases though wet season greens require more restraint avoiding garish over-saturation.

Advanced Processing Techniques
Dodging and burning: Selectively lighten (dodge) or darken (burn) specific image areas directing viewer attention and creating emphasis. Common applications include darkening distracting bright areas in backgrounds, lightening subjects emerging from shadows, and adding subtle vignettes focusing attention centrally.
Selective sharpening: Apply sharpening selectively to important areas like elephants' eyes and facial features while leaving backgrounds soft. This technique enhances subject sharpness perception without amplifying noise or artifacts in less important image areas.
Noise reduction: High-ISO images require noise reduction balancing artifact reduction against detail loss. Modern noise reduction algorithms preserve remarkable detail while cleaning obvious noise, though aggressive application creates plastic, over-processed appearances. Process conservatively then examine results at actual viewing sizes (screen resolution or print size) rather than at 100% magnification nobody views normally.
Lens correction: Apply lens correction profiles removing distortion, vignetting, and chromatic aberration—optical imperfections most lenses exhibit. Modern software often applies these corrections automatically based on embedded lens metadata, though manual application remains necessary for older lenses lacking profiles.
Cropping and Straightening
Improving composition: Crop images improving composition by removing distracting elements, tightening framing on subjects, correcting awkward positioning, and adjusting aspect ratios. While composing carefully in-camera remains ideal, judicious cropping during post-processing perfects compositions achieving stronger final images.
Resolution considerations: Heavy cropping reduces image resolution potentially limiting large print sizes or revealing noise and loss of detail. However, modern high-resolution cameras often produce files so large that significant cropping still yields perfectly adequate resolution for most uses including very large prints.
Horizon straightening: Tilted horizons distract from otherwise strong images. Straighten horizons during post-processing using grid overlays ensuring level lines. However, slightly tilted horizons sometimes work artistically creating dynamic energy—rules exist to be broken when results justify the violation.
Aspect ratio changes: Experiment with different aspect ratios (square, panoramic, various rectangular proportions) potentially improving composition and impact. Some images work better as verticals than horizontals or benefit from ultra-wide panoramic crops emphasizing landscape scope.
Ethical Wildlife Photography
Respecting Animal Welfare
Distance maintenance: Never pressure safari drivers to approach elephants closer than regulations permit or animals' comfort levels indicate. Ethical wildlife photography prioritizes animal welfare over getting extreme close-ups, recognizing that stressed, disturbed animals shouldn't be photographed regardless of potential image quality.
Behavioral awareness: Watch for signs that elephants are uncomfortable with vehicle presence including agitation, threat displays, altered movement patterns to avoid vehicles, or obvious stress. If animals appear disturbed, back away immediately rather than continuing photography. No photo justifies causing animal distress.
Flash prohibition: Never use flash photography on wildlife. Flash stresses animals, potentially provokes dangerous defensive reactions, and may temporarily impair night vision in species adapted for low-light conditions. All safari parks prohibit flash, and ethical photographers respect these rules unconditionally.
Reproduction ethics: While elephants' breeding behaviors provide fascinating photography subjects, extreme discretion and distance become even more critical during these sensitive moments. Never approach breeding groups closely or position vehicles in ways interrupting natural behaviors.

Sharing Viewing Opportunities
Collaborative approach: On shared safaris, work cooperatively with other passengers allowing everyone photography opportunities rather than monopolizing prime positions. Rotate shooting positions during stops, avoid blocking others' views unnecessarily, and recognize that non-photographers deserve enjoyable viewing experiences equal to photography enthusiasts.
Time management: While photographing, remain conscious of time spent at individual sightings. Other passengers may have seen enough while you're still shooting, or conversely, others may want more time than you require. Communicate and compromise ensuring equitable safari experiences for all participants.
Private jeep responsibility: Even in private jeeps where you control timing completely, consider broader wildlife viewing ethics. Spending excessive time surrounding individual elephants potentially stresses animals or prevents other vehicles from viewing. Balance your photography passion against wildlife welfare and other visitors' experiences.
Conservation Through Photography
Inspiring conservation: Powerful wildlife images inspire viewers to care about elephant conservation, raising awareness about threats elephants face and generating support for protection efforts. Share your best images widely with appropriate conservation context and messaging, potentially recruiting others to conservation causes through emotional connection your photos create.
Accurate representation: Photograph elephants honestly showing them as wild animals in their natural habitat rather than anthropomorphized pets or always-gentle giants. Accurate representation helps viewers understand elephant conservation's complexity including human-wildlife conflict challenges and the reality that these are large, powerful, potentially dangerous animals requiring specialized management.
Supporting ethical tourism: By choosing responsible safari operators, respecting wildlife viewing regulations, and sharing positive experiences from ethical operators, photographers influence tourism toward sustainable practices benefiting conservation rather than exploitative approaches harming wildlife for profit.
Final Thoughts: Capturing Udawalawe's Magic
Udawalawe safari photography offers extraordinary opportunities for capturing stunning wildlife images showcasing Asian elephants' magnificence, Udawalawe's diverse ecosystem, and the privilege of witnessing wild animals in protected habitat. Success comes from combining technical camera mastery with artistic composition skills, behavioral awareness enabling you to anticipate and capture decisive moments, and ethical practices ensuring your photography supports rather than harms conservation.
Remember that while technical perfection matters, the emotional power of your images often exceeds their technical merits. A technically imperfect photo capturing authentic emotion or fascinating behavior frequently proves more valuable than a perfectly exposed, sharply focused but emotionally empty image. Prioritize capturing meaningful moments showing elephant personalities, family bonds, dramatic behaviors, and the wildness that makes Udawalawe special, then apply your technical skills polishing these compelling moments into finished images.
Approach your Udawalawe photography with preparation, flexibility, and openness to learning. Test equipment before departure understanding capabilities and limitations, shoot extensively during safaris since digital photography costs nothing beyond storage, review images between safaris learning from successes and mistakes, and most importantly, occasionally put the camera down simply experiencing elephants directly rather than exclusively through a viewfinder. The memories of being present with wild elephants prove as valuable as the photos you capture, and sometimes the unobstructed experience creates even more lasting impressions than any photograph.